You start by selecting the plan and then you select the key symbol on the left-hand side of the structure (1). The security window will appear. Select: “Add User” (2) and from here you search for the user in the database. Select the user, that you wish to add and then OK. Then you select the access boxes, to grant access to the user and you save the amended plan. Click Remove (3) to remove a user. A user with Write rights is allowed to update the planning and attributes. Change-rights allows a user to edit the access settings.


If a user requires write access to a plan and none of the users with change rights are available, contact on of the LEQM key users at your company who have access to all LEQM plans. To give access to all plans in a project, right click on any of the plans to the left and choose ”Add User To All Plans”. And again, search for the user and click: ‘OK’.
If there are base/slave connected plans to the plan you like to delete, disconnect these before delete. Then right click on the plan and select "Delete plan".
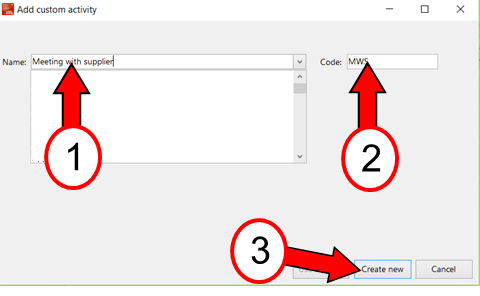
To insert a new activity into a plan (Custom activity), right click on the line in the plan where it should be placed and select “Insert custom activity”. Enter the activity name (1) and (optional) modify the auto generated activity code (2). Click Create new (3). NOTE: If the plan view has been sorted on one or more columns new activities can not be inserted. A sign that a sorting is active is a gray triangle in the column headline.To remove a sorting, click on the headline with the triangle one or two times until the triangle disappears. The plan view can be sorted on a column that is currently not visible/hidden. To display or hide plan columns, make selections under “Plan Columns” under the Edit menu. Also note that an activated sorting is removed when LEQM VPL is restarted.
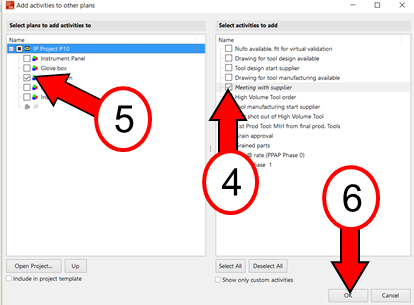
Custom activities can be distributed to other plans by right click in the plan you should copy from and select ”Copy activity to other plans”. Select what activities (4) should be copied to which plans (5). Click OK (6).

You right click on the activity and select "Show activity explanation".
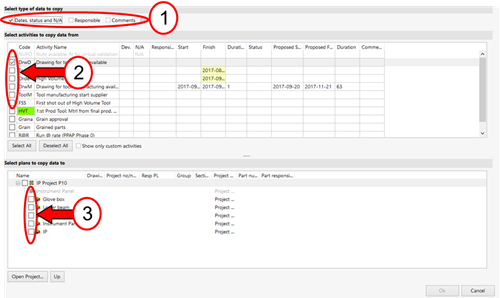
Planning (dates, N/A and Status) and other activity data can be distributed from one plan to other plans. Right click on the plan you like to copy from, select “Copy activity data to other plans”. A Copy activity data window will appear. First select what kind of data that should be copied (1). Then select the activities to copy from (2). Note the option ”Select All”. Finally select the plans the data should be copied to (3) and click OK.

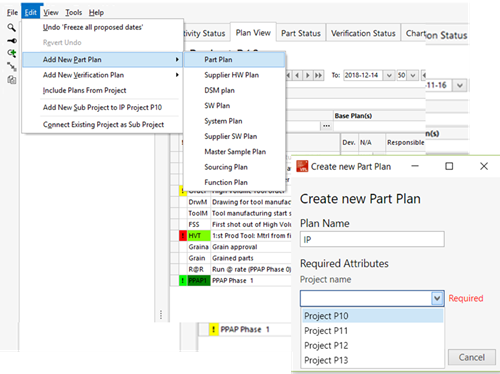
To create a part plan, you could either get parts from your company`s part database, - if this is required, contact one of the LEQM key users at your company who will guide you - or you can also create a plan manually.
To create a plan manually, choose "Edit", "Add New Part Plan", and then select "Part Plan". A Create new Part Plan window will appear. Fill in the required attributes, in this example; Plan Name and Project name, then click OK.

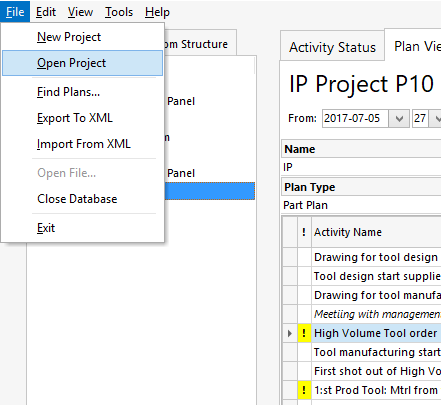
To locate your project. You start by selecting File and Open Project. An Open window will then appear.
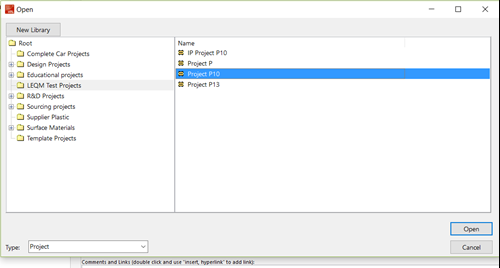
To the left, click on suitable project folder and locate your LEQM project on the right hand side. Mark your project and click ”Open”.
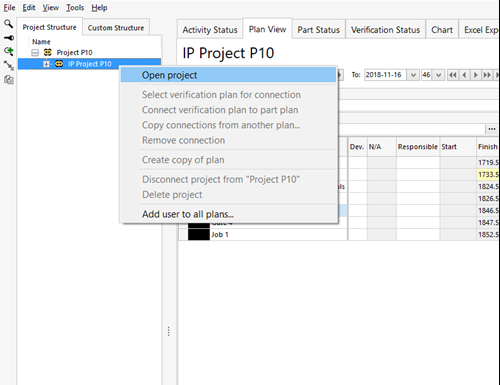
Now your are at the top level of the project. To find your specific project, click on the plus symbol. Select your project, and then right-click and then select "Open project" from the popup menu.

A probable reason for this problem is that the plan view has been sorted on one or more columns (for example the Finish column). New activities can not be inserted with an activated column sorting. A sign that a sorting is active is a gray triangle in the column headline.
To remove a sorting, click on the headline with the triangle one or two times until the triangle disappears.
Note, the plan view can be sorted on a column that is currently not visible/hidden. To display or hide plan columns, make selections under “Plan Columns” under the Edit menu. Also note that an activated sorting is removed when LEQM VPL is restarted.
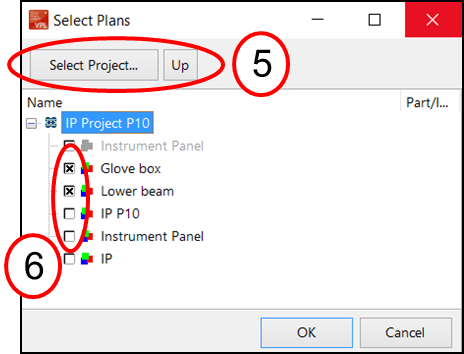
Two or more plans can be connected to create a Base-Slave relation. A Base-Slave connection keeps the slave plan(s) automatically updated when the base plan is modified until the connection is removed. To assign a Base plan to a plan, click on the attribute Base Plan (1). Locate the project (2) in which the Base plan is located, mark the plan (3) and click OK.
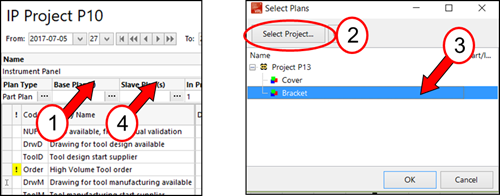
To assign Slave plans to a plan, click on the attribute Slave Plan (4). Locate the project (5) in which the slave plans are located, mark the plans (6) and click OK.
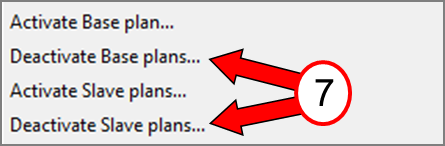
To deactivate a Base-Slave connection, right click in the plan and select ”Deactivate Base plans… ” or ”Deactivate Slave plans… ” (7). Connecting two (or several) plans as Base-Slave can save a lot of time when keeping the planning updated. However, the user has to be sure that the plans should have identical planning on all activities before connecting.
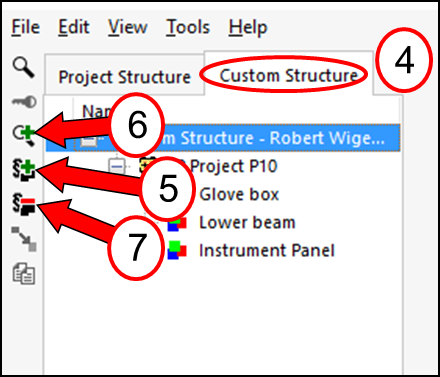
A user can select plans in the database and put them in the personal Custom Structure (4) for easy access. No other users are affected by this and most of the VPL functionality is available also in Custom Structure. To add plans to the Custom Structure, click on the button (5) in the toolbar. The button (6) allows the user to search the database for plans and then add them to the Custom structure. o remove plans, click on the button with a red minus sign (7).